The Aces High Witchraft Skin Project
Here is a list of things still needing to be done on the skin. Some illustrations
below and a link to the bmp I used for the skin are given below. For a bunch
of historical pictures, see this page.
- Vertical stabilizers and rudders, on lower half of inside, are gray, not
green.
- Correct the waves shapes, make the boundary between gray and green non-fuzzy,
make the gray/green border flat along bomb-bay doors.
- Remove the "3" and "9" on engine because we can't get
around the mirroring of the numbers. (Also, there was no "9" --
just the "3".)
- Mirror the tail number on the left tail (i.e., mirror it) so that it does
not come out mirrored on the tail.
- Move up the "DRE" half of "AUDRE", so that the "A"
and "E" sides match in height. It will still be garbled -- no getting
around that, but at least the sides will be even height.
- Add the "circle P" on the right top wingtip.
- Slightly lighter shade of olive drab on the ailerons, elevators, and rudders.
- Correct the colors and boundary between green/gray on the engine cowlings.
- Make prop hubs aluminum color, not black.
- Wrap olive drab around leading edges a bit (to be even with bottoms of de-icing
boots).
Some things to ponder to decide if we do them or not -- i.e., don't do these
yet, let's think about it:
- Darken deicing boots?
- Make exhaust marks under wings much less pronounced and shaped differently?
- Add more realism to panels and joints?
- Can we use the default B-24 .bmp as an overlay of dirt and panel markings
for this bmp?
Illustrations of the above. The artwork and modifications done by Brooke are
like a child with a crayon would do and are meant for illustration only (poor
illustrations that get the point across), not to show exactly how it is done.

To help with getting the waves right, I scaled a picture of the real Witchcraft
and used it as a skin. That shows what the wave boundary should be, and it shows
that the boundary is sharp (like with a brush used to paint it), not fuzzy like
with spraypaint. Over the bomb-bay doors, the gray/green boundary is flat, then
back to waves. The waves are farther down the fuselage and in a different amplitude
and wavelength than in the previous incarnation of the skin. Historical pictures
show what the waves should be like. It is possible to make them historically
accurate without (just barely without) running into the weirdness at the bottom
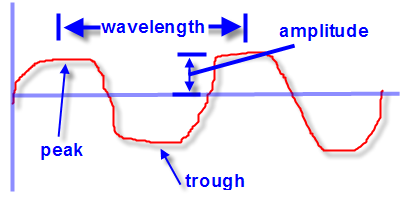
of the plane if you make the troughs too deep and too low. ("Amplitude",
"wavelength", and "trough" are all defined terms for waves,
as shown below.) The leading edges should have olive drab wrap around to meet
up with the lower edge of the de-icing boots on all leading edges (including
tail).

Note that the boundary of gray/green on engine cowlings go straight from under
leading edge forward, not looping back a bit then forward. The gray continues
forward to the front of the cowling underside about even with the bottom of
the side cressent-shaped vents.
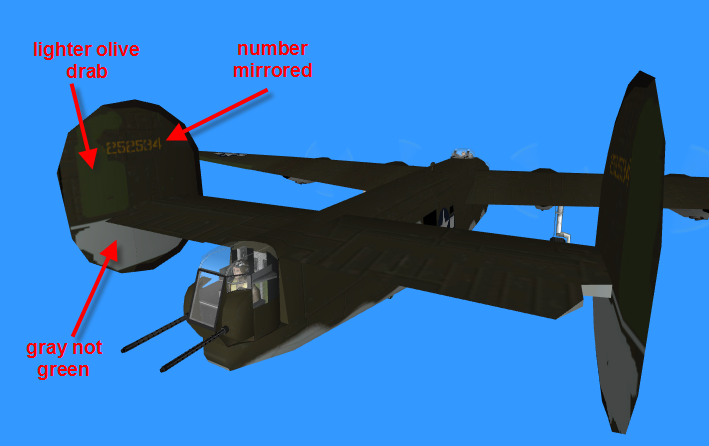
You can mirror the left tail number to come out right in the skin. The tail
should have an inside bottom half that is gray. The inside rudder (like ailerons)
should be a lighter olive drab. The lighter olive drab I picked is not the correct
color -- you pick a good one. I used it just for illustration. I forgot to make
the elevators slightly lighter color.
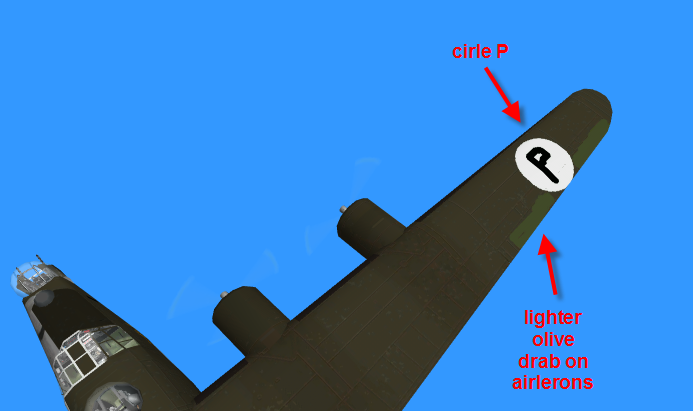
The circle P and lighter olive-drab ailerons. (Again, not the correct lighter
shade -- just picked for illustration.)
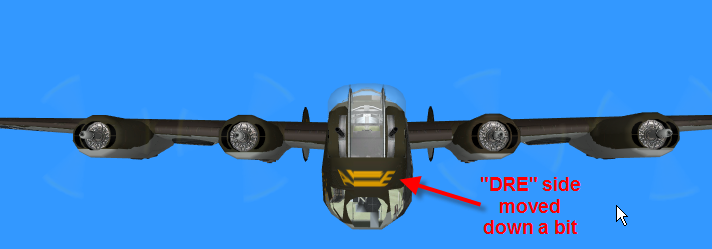
If the "DRE" part of "AUDRE" is moved down, it matches up
better in height with the "AUD" part. This also showshow the gray/green
on the engine cowls sweeps forward more smoothly from the leading edge. No "3"
or "9" on engine cowlings.
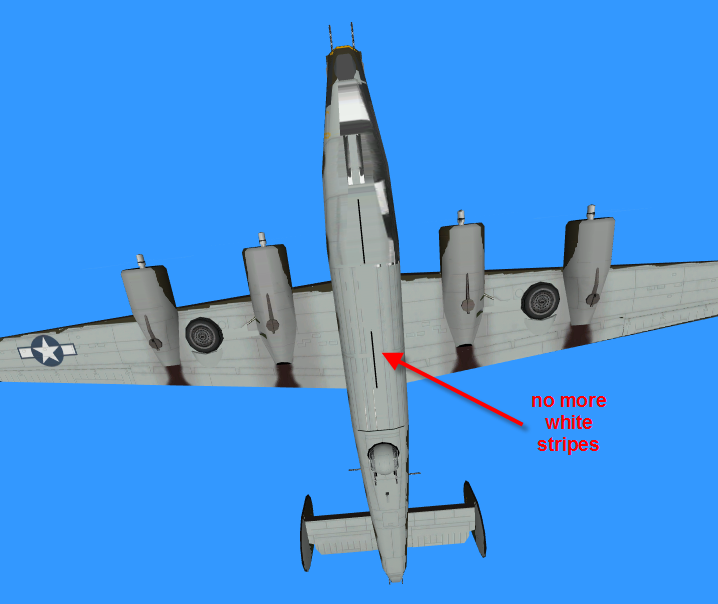
Can't do the white stripes because of the odd wrapping on the bomb-bay doors.
Here is the bmp that I used to generate
these pics. Right click and pick "save target as".
Brooke P. Anderson
e-mail: brooke@electraforge.com