“The Battle of the Western Kuban” Scenario
Document version 16
Dates and Times
- Special Events 2 Arena.
- Show-Up Time is 3 pm Eastern -- the arena is locked after that.
- Dates:
- Practice Frame: [tbd on whether or not we have one]
- Frame 1: February 17
- Frame 2: February 24
- Frame 3: March 3
- Frame 4: March 10
- End of hostilities is approx. 6:30 pm Eastern.
History
Fight for the Kuban
By the spring of 1943, replenished from the disastrous losses of 1941 and heartened by the victory at Stalingrad, the Red Air Force stepped up efforts to challenge Axis air superiority on the Eastern Front. This included a series of major air battles over the southern Kuban River. The air campaign, lasting between April and June 1943, became a turning point in the battle for the Caucasus. The Luftwaffe, looking to use its numerical superiority and traditional tactical edge to its advantage, planned to swiftly destroy local Red Air Force assets before turning its attention to ground support missions.
Axis forces, consisting of about 1,200 aircraft, including the Luftwaffe’s mainstay BF-109 and FW-190 fighters and He-111, Ju-87 bombers and Ju-88 multirole combat aircraft, matched up against an assorted collection of Soviet and lend-lease Red Air Force planes, including LaGG-3, La-5, Yak-1, Yak-7B, P-39 Airacobra, P-40E Kittyhawk and British Spitfire MK.V fighters, and Pe-2, Il-2, and Il-4 bombers and ground attack aircraft.
The Aces High Scenario team will be reenacting the battles that took place over the Kuban River southwest of Stalingrad in this heart pounding and fast action packed thriller the Battles of the Western Kuban. It will involve air combat, bomber intercept, escort, and ground attack.
Main Rules
- General:
- Everyone including CO's, please follow instructions from game-day CM's, or you can be ejected from the arena.
- Please follow instructions from your commanders, or you can get reassigned or ejected from arena.
- Bombers must take off whenever possible with formations and not intentionally lose drones.
- Please read “Victory Conditions” section below.
- Level bombers must level bomb, not divebomb or glidebomb.
- If you need back into the locked arena, type ".p brooke let me in" into any text buffer, then try to get in even if arena says it is locked.
- Lives:
- Fighter pilots get two lives plus see below.
- Bomber and attack pilots get three lives plus see below.
- If you use up lives in your main ride, you get two more lives in either an Il-2 (for allies) or Ju 87 (for axis).
- You use up a life if you die, crash, ditch, bail, or exit your plane with anything other than a “landed successfully”.
- You can man a gun at any time (for bomber or ground gun), and deaths in guns don't count to your life total.
- Altitudes:
- Any plane carrying bombs or rockets, max alt is 16k.
- There is a gentle downwind at 20k. You can fly into it, but it will sap your plane’s energy if you stay above 20k for long.
- Side CO (called a “CiC” in FSO’s):
- The CO can fly whatever aircraft he wants, even if it boosts a group over the number limit it would otherwise have.
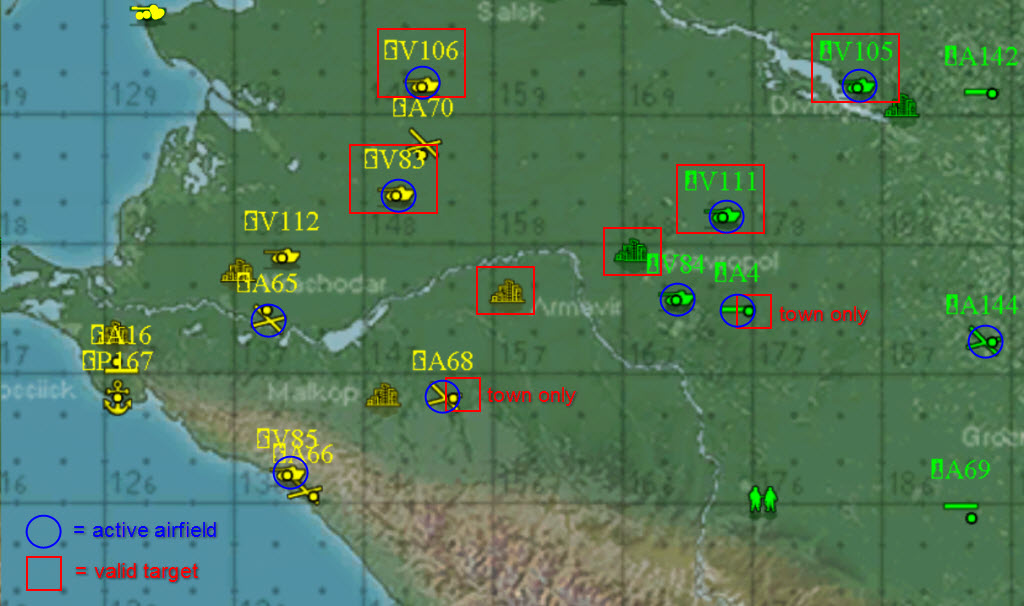
Map
Victory Conditions
If a side fails to do this in the frame, it will get no points at all for that frame:
- Bomber groups must Attempt at least two bombing Missions.
- Attack groups must Attempt at least three bombing Missions.
- “Attempt” means to bomb a target or die trying.
- One “Mission” is launch, travel toward one or more target areas, and land back at a base if still alive.
Points in a frame:
- For kills:
- 1 point per kill of any enemy aircraft except Il-2’s and Ju 87’s.
- There are no points for killing Il-2’s or Ju 87’s; but in killing them you do stop them from gaining points for their side.
- For attacks on Valid Targets:
- 3 points for each level bomber (Ju 88 or Boston) that destroys at least one hangar in a Mission.
- 1 point for each level bomber (Ju 88 or Boston) that destroys at least one city or town building in a Mission.
- 1 point for each attack aircraft (Bf 110 or A-20) that destroys at least one bunker (fuel, ammo, barracks, or radar) in a Mission.
- 0.33 points for each attack aircraft (Bf 110 or A-20) that destroys at least one ground gun in a Mission.
- 0.25 points for each Il-2 and Ju 87 that destroys at least one bunker in a Mission.
Each frame will be scored separately, with victory going to the side with the most points. The final winner is the side that has won the most frames.
Note for clarity: “3 points for each level bomber that destroys at last one hangar in a Mission” means that if a bomber pilot goes up in a Mission and destroys 1 hangar, he gets 3 points. If he destroys 2 or 3 hangars in that same Mission, he still gets only 3 points. Likewise for the other points and objects. Thus, for bomber pilots, once you destroy one hangar and one city or town building in your Mission, you are at max points (4 points); for attack pilots, once you destroy one bunker and one gun in your Mission, you are at max points (1.33); and for Il-2 and Ju 87 pilots, once you destroy one bunker in your Mission, you are at max points (0.25).
Valid Targets
The following are Valid Targets, including all the ground guns, buildings, bunkers, and hangars upon them. Attacks on any other targets or objects upon any other locations do not count for scoring.
Each frame:
- Axis may attack: City (15,7,9); V105; V111; Town only (not airfield) at a4.
- Allies may attack: City (15,7,4); V83; V106; Town only (not airfield) at a68.
Allied Order of Battle
VVS Units (24 fighters, 6 attack, 6 bombers = 36 total)
Unit Name | Aircraft Type | No. of Seats |
244th Bomber Aviation Regiment | Douglas Boston III | 6 |
13th Guards Bomber Regiment | Douglas A-20G Havoc | 6 |
16th Guards Fighter Aviation Regiment | P-39Q Airacobra | 6 |
1st Guards Fighter Regiment | Yak-7B | 6 |
3rd Guards Fighter Aviation Regiment | La-5FN | 6 |
57th Guards Fighter Aviation Regiment | Supermarine Spitfire V | 6 |
Active Fields: V105, V111, V84, A4, A144 (except that level bombers not enabled at vbases). Note that vbases can be challenging to take off from and land at -- please practice.
If allied fields look to be capped or about to be capped in judgement of allied side CM, the allied side CM may enable flight from a69.
Ordnance:
- Fighters may not carry bombs or rockets.
- A-20G can carry [4] 500 lb bombs internally and [4] 250 lb bombs externally.
- Boston III can carry [4] 500 lb bombs.
- Il-2 can carry [4] 100 kg bombs internally; [0-4] RS-82 rockets externally; and 20 mm cannon.
Axis Order of Battle
Luftwaffe Units (24 fighters, 6 attack, 6 bombers = 36 total)
Unit Name | Aircraft Type | No. of Seats |
III/KG 51 | JU88A-4 | 6 |
II/ZG 1 | BF110G-2 | 6 |
II/SchG 1 | FW190A-5 | 6 |
II/JG 52 | Bf109G-2 | 6 |
III/JG 52 | Bf109G-2 | 6 |
13 (Slovak) JG/52 | Bf109G-2 | 6 |
Active Fields: A65, V85, V83, V106, A68 (except that level bombers not enabled at vbases). Note that vbases can be challenging to take off from and land at -- please practice.
If axis fields look to be capped or about to be capped in judgement of axis side CM, the axis side CM may enable flight from a16.
Ordnance:
- Bf 109’s and FW 190’s may not carry bombs or rockets or gondolas.
- Bf 110G-2 can carry [2] 500 Kg Bombs, 2x20 mm cannon, and 2x30 mm cannon.
- Ju 88A-4 can carry [4] 250 Kg Bombs externally and zero bombs internally.
- Ju 87D-3 can carry [1] 500 Kg Bomb centerline and [4] 50 Kg Bombs on wings.
Moving Around Pilots
CO's may split fighter groups up into separate flights and send them on separate missions as they see fit.
CO's may assign walkons as they see fit up to the limit of slots available.
CO's may move registered pilots to different aircraft if the registered pilots are willing. But if a registered pilot wants to keep the plane he is registered for, he must be allowed to stay in that plane.
Settings
Terrain. blksea
Wind. 45 mph downwind at 20k.
Clouds. Scattered Clouds
Radar and Sector Counters. No dot radar. Sector counters above 1000 ft.
Radar ownership outside of map area should
be set so that those bases’ radar do not encroach on enemy territory.
Some of those outlying bases may need to be set to rook to
accomplish that.
ArenaFlags = 13358
BomberWarningRange = 15,840 (3 miles)
CommunicationFlags = 3
CountryChangeTime = (no changing of countries once started)
ExitWhileMoving = 508
FighterWarningRange = 15,840 (3 miles)
FlightModeFlags = 5248
FuelBurnRateMult = 1.0
GroundAutoLethality[Armored] = 0.15
GroundAutoLethality[Hard] = 0.15
GroundAutoLethality[Soft] = 0.15
RadarMode = 400 (Disable Friendly Counters, Counters Above Radar, Range Based Counters)
SectorCounterAlt = 1000
SectorCounterRange = 211,200 (40 miles)
TowerBasedRadarRange = 211,200 (40 miles)
StratFlags = 1
WarningFlags[rook] = 0 (no base flashing for rook bases)
Arm auto gun, down time = 5
Auto gun, down time = 5
Bmbr hgr, hardness = 2, down time = 5
Bunk ammo, hardness = 0.5, down time = 5
Bunk barracks, hardness = 0.5, down time = 5
Bunk fuel, hardness = 0.5, down time = 5
Bunk radar, hardness = 0.5, down time = 1
Ftr hgr, hardness = 2, down time = 5
Gun bat, down time = 5
Gun bat armor, down time = 5
Gun bat soft, down time = 5
Hard auto gun, down time = 5
Hard gun bat, down time = 5
Town, down time = 5
Veh hgr, hardness = 2, downtime = 5
MOTD
Welcome to the Scenario "The Battle of the Western Kuban"!
To play, please show up at 3 pm Eastern on Saturday.
If you are not registered, you are welcome to play,
but please stay in country Rook until you are assigned
to a side.
Fighter pilots get two lives. Bomber and attack pilots get
three lives. Each pilot will have access to two additional
lives in a Ju 87D-3 or IL-2 Type 3 after using up primary
lives.
You use up a life if you die, crash, ditch, bail, or exit
your plane with anything other than a "landed successfully".
If you need back into the locked arena, type ".p brooke
let me in" into any text buffer. Then try to come in
even if the arena says its locked.
Historical Context
The Kuban Bridgehead (German: Kuban-Brückenkopf), also known as the "Goth's head position" (German: Gotenkopfstellung), was a German position on the Taman Peninsula, Russia, between the Sea of Azov and the Black Sea. Existing from January to October 1943, the Bridgehead formed after the Germans were pushed out of the Caucasus. The heavily fortified position was intended as a staging area for the Wehrmacht which was to be used to renew attacks towards the oil wells of the Caucasus. The bridgehead was abandoned when the Red Army breached the Panther–Wotan line, forcing an evacuation of the German forces across the Kerch Strait to Crimea.
Case Blue (Fall Blau), launched 28 June 1942, saw Army Group South divided into two Army Groups, Army Group A and Army Group B, the former participating in the Battle of the Caucasus. Throughout the operation the German situation especially that of Army Group B centered on Stalingrad began to deteriorate. As Army Group B began collapsing in the North, Army Group A quickly found itself at risk of being flanked. It was forced to abandon its task of securing the oilfields of the Caspian, and began withdrawing down the Terek River toward the Taman Peninsula.
Following the encirclement of the 6th Army at Stalingrad, Army Group A withdrew towards the Black Sea and Crimea. The 17th Army, commanded by Richard Ruoff and Erwin Jaenecke, constructed a defensive position across the Kuban River delta in the Taman Peninsula, which was completed in January 1943. The main, first defense line started by Novorossiysk and run roughly northwards all the way across the peninsula. Consisting of 5 defense lines, the total depth of the defense area was up to 60 km. German forces, moving from positions along the Terek River, fully occupied the new defensive network in February 1943 while under constant attack by the Red Army . The bridgehead, originally intended to provide a staging area for future attempts to gain control of the Caspian oil fields, was re-tasked on 3 September 1943, as the German situation on the Eastern Front continued to deteriorate. The Kuban Bridgehead then served to evacuate German forces as the withdrawal of Army Group South to the Dneiper Line had become inevitable.
The first defenses of the Kuban Bridgehead were breached on September 15–16, 1943 in the area of Novorossiysk during the Novorossiysk-Taman Operation (ru) of the Soviet North Caucasian Front.The Taman Peninsula was completely cleared of German forces on 9 October 1943.
The defense of the Kuban Bridgehead permitted the evacuation of 239,699 soldiers, 16,311 wounded, 27,456 civilians (nearly all Russian population of Novorossiysk able to work), 115,477 tonnes of supplies (including ammunition), 21,230 motor vehicles, 74 tanks, 1,815 guns, and 74,657 horses to the Crimea.[citation needed] The Luftwaffe, operating from a field airport at Slavyansk-na-Kubani, withdrew a further 15,661 men.[citation needed] Transportation over the narrowest point of the strait, measuring four kilometers, was done by Marinefährprahm ferry barges and a sea cableway. A combined road and rail bridge was constructed, but was destroyed shortly before completion in October 1943.
The Taman bridgehead - 1943
On 26 May 1943 the Soviets launched their fourth attack, with the main thrust on the direction of Krimskaya and Anapa. 6 infantry divisions and 3 tank brigades were concentrated between Kyevskoe and Moldovanskoe and these forces managed to make a breach 5 km deep. They were stopped on the line between Svoboda, Gogolia, Noviy, Sadoviy and Pobeda,but they had taken the villages Samsonovskiy, Tambulovskiy, Podgorniy, Arnautsky, Palmenskiy and Hill 121. The Axis counterattack threw them back 2 km and retook Podgorniy, Arnautsky and Hill 121. The following day, the Red Army restarted its attacks in the sector, but with little success. By 4 June, they had only managed to reoccupy Hill 121.
The 19th Infantry Division had been reintroduced in the first line, but its combat effectiveness had dropped, because the replacements it had received were inexperienced. It was again broken into smaller pieces and assigned to several German units: to the 97th Division went the 1st Battalion/96th Infantry Regiment; to the 101st Division went the 2nd Battalion/95th Infantry Regiment, 94th Infantry Regiment, 19th Light Infantry Battalion, 2nd and 3rd Battalions/37th Artillery Regiment; to the 79th Infantry Division went the 2nd Battalion/96th Infantry Regiment, 19th Recon Group, 19th Pioneer Battalion, 994th Independent Infantry Battalion, 1st and 2nd Battalions/42nd Artillery Regiment. The 1st Battalion/96th Infantry Regiment and 2nd Battalion/95th Infantry Regiment were on the main direction of the Soviet assault and suffered many casualties, being reduced to one company each after the fighting on 26 and 27 May. In the repulse of the enemy attack also distinguished themselves the 94th Infantry Regiment and the 37th Artillery Regiment.
The 3rd Mountain Division was also broken into several parts, which were assigned different German units: the 5th, 11th and 12th Battalions and the artillery to the 79th Infantry Division and the remaining 6th, 21st and 22nd Battalions to the 9th Infantry Division. The latter did not take part in the fighting, but the 6th Mountain Battalion suffered heavy casualties from Soviet artillery fire and aerial bombardments.
The Cavalry Corps had under its command the 10th Infantry Division and 9th Cavalry Division, which were deployed on the seaside. The 6th Cavalry Division (without the 5th Calarasi Regiment and the 2nd Battalion/4th Horse Artillery Regiment, which were assigned to the 10th Infantry Division) and the 38th Infantry Regiment were subordinated to the German 4th Mountain Division.
After 4 June 1943, the fighting decreased in intensity and changes could be made in the Axis ranks. The 10th Infantry Division replaced the 19th in the frontline. The latter was sent on the seaside, near Anapa. The 3rd Mountain Division was retreated to Crimea, where it assumed defensive positions between Ak Monay and Bulganak (in the Kerch Peninsula). The 1st Mountain Division was brought in the Kuban and, on 28 June, it took over the line from Adamovichia to 8 km north of it. It had the 2nd and 3rd Mountain Battalions, the 37th and 137th AT Battery, the 186th German Infantry Regiment, the 3rd Battalion/213th German Infantry Regiment. The 1st Mountain Battalion was in reserve and the artillery support was provided by the 1st Battalion/4th Artillery Regiment and 2nd and 4th Battalions/175th German Artillery Regiment. The 23rd Mountain Battalion was subordinated to the German 213th Infantry Regiment (replacing the battalion this regiment gave the division), while the 4th and 24th Mountain Battalions and the 1st Mounted Vanatori Squadron were in the reserve of the German 9th Infantry Division. The 3rd Battalion/4th Artillery Regiment was at Nova Bakanskaya, also under the command of the 9th Division.
The Red Army launched its fifth offensive on 16 July. They managed to obtain only small gains in the sector between Moldovanskoe and Kyevskoe and were later repulsed to the starting positions, by the counter-attacks mounted by the German and Romanian troops.
In the Neberdshayevskaya – Dolgaye Mountain sector, the 1st, 23rd and 24th Mountain Battalions distinguished themselves especially between 24 and 30 July. The 23rd Battalion was stretched over a line 4.8 km long, between Neberdshayevskaya – 1 km SW Hill 352. Gen. Vasiliu-Rascanu, the CO of the 1st Mountain Division, decided to shorten its line by introducing the 1st Mountain Battalion in the front line. Thus one company was made available and was supposed to be used as a reserve. But the commander of the German 213th Regiment considered that the area was not suitable for a Soviet offensive (difficult, wooded terrain) and relocated this small reserve. The attack of the Soviet 9th and 83rd Mountain Divisions (from the 56th Army) started early on 24 July, with the support of 15 artillery battalions. After four hours of heavy combat against a superior foe and lacking reserves, the battalion had to retreat towards Hill 352. The German command assembled a force of 8 battalions (including the Romanian 24th Mountain Battalion) to counter-attack, but this action failed. The German command in charge of the sector (Group Bünau) tried to put the blame for failure on the “poor morale and determination” of the Romanian troops. The reply from gen. Vasiliu-Rascanu came quickly and it signalled the mistakes made by the Germans, the use of Romanian units on fronts longer than their possibilities to defend efficiently and criticized the “corseting” system they used with the Romanian units. The German command went as far as taking companies away from battalions and relocating them. This led to the worsening of the morale of these units, which felt isolated and even abandoned by their original commanders.
In the bridgehead south of Novorosiysk, two Soviet battalions breached the position of the 5th Calarasi Regiment (from the 6th Cavalry Division) and took a hill north on Mountain Mishako. Between 22 and 28 July the Romanians tried several times to recapture it, but failed in front of the powerful and determined defence. A German attack had the same result. The regiment lost 50% of the officers and NCOs and 24% of the soldiers. On the other hand, the rest of the 6th Cavalry Division managed to hold its position, the 3rd Squadron/9th Rosiori Regiment, under the command of cpt. Niculescu, distinguished itself during those days.
In the Moldovanskoe and Kyevskoe sectors, the Soviets made little progress and were later pushed back to the starting positions by the German-Romanian counterattacks. On the Kurka Channel there were only two small attacks, both of which were repulsed.
Taking advantage of the pause in the Soviet actions, the 6th Cavalry Division was replaced in the first line by the 4th Mountain Division and sent to Crimea for rest. The 3rd Dive Bomber Group, equipped with Ju-87D3s and D5s, was dispatched to Kerch, from where it supported the operations of the German and Romanian forces in the Taman bridgehead.
References
- Early Versions of Airacobra Aircraft in Soviet Aviation (2016) Valeriy Romanenko [Soviet VVS]. Retrieved from http://lend-lease.airforce.ru/english/articles/romanenko/p-39/
- Red Stars 4 Lend-Lease Aircraft in Russia; Author(s): Carl-Fredrik Geust, Gennadiy Petrov; Publisher: Apali Oy [Finland]; ISBN: 952-5026-23-X
- Timofeeva-Egorova, Anna. Over Fields of Fire: Flying the Sturmovik in Action on the Eastern Front 1942-45 (Soviet Memories of War) (p. 2). Casemate Publishers. Kindle Edition.
- Attack of the Airacobras: Soviet Aces, American P-39S, and the Air War Against Germany (Modern War Studies), December 1, 2001, by D. F. Loza.
- Gunther Rall, by Amadio.
- Luftwaffe Fighter Ace, by Norbert Hanning.
- German Aces Speak, by Heaton and Lewis.
- Bomber Pilot on the Eastern Front, by Reshetnikov.
- Red Star Against the Swastika: the story of a Soviet pilot over the Eastern Front, by Emalianenko.
- Il-2 Shturmovik, by Moore.
Credits
Originator: Krupinski
Designer: AKWarHwk
Host CM: Brooke
Allied CM: AKWarHwk (BB Swareiam)
Axis CM: Ditto (BB KCDitto)
Axis CO: Perdweeb (BB perdue3)
Allied CO: Dantoo
Change Log
12/27/2017: Incremented to revision 2.
- Changed the usage of attack aircraft in the event to the fighter pilots third flight. Made the modification to the event write up.
1/1/2018: Incremented to revision 3.
- Made grammar and sentence structure edits to to the Dates and Times sections
- Made content edits to the Overview of Battle section.
- Added more definition in the Victory Conditions section.
- Better definition of targets.
- Better definition of the use of attack aircraft in the criteria and rules area.
- Added better definition to the Point Scoring section.
- Added better defined the use of ordnance and its availability.
- Reconciled the ordnance carrying capability of each aircraft and their opposing match on the opposing side.
- Additional ordnance may have been added to specific aircraft to balance out their counterparts use of lethal canon.
- Removed the use of the 20 mm wing gondolas from the Bf109s for fire power balance.
- Adjusted the number of units available in the Unit Definition Tables.
- Highlighted the location of each sides attack aircraft; JU87D-3s and IL-2 Type 3s.
- Defined the use of the JU87D-3s and IL-2s in the Rules section.
- Specifically defined the number of lives for BF110G and A-20G pilots.
- Made specific notation that bomber pilots will have no access to JU87s or IL-2s in the Rules section.
- Added more definition of the capabilities of the level bombers in the Rules section.
1/2/2018: Incremented to revision 4.
- Removed one group of Axis aircraft and one group of Allied aircraft.
- Reduced the overall number of registered aircraft on both sides to 36.
- Opened up all aircraft availability at all fields per side.
- Change the opening date of the event to February 17th.
1/6/2018: Incremented to revision 5.
- Set scenario dates to TBD.
- Modified the placement of airfields.
- Decreased the number of active airfields and increased the number of active vehicle bases to fly from.
- Decreased the downwind speed from 75 mph to 45 mph and altitude from 24k to 20k.
- Decreased the maximum bomber altitude from 18k to 16k.
- Displaying all active fields within the write-up.
- Changed SectorCounterRange and TowerBasedRadarRange to 211,200 (40 miles)
- Changed the HE111H gruppe to a JU88A-4 gruppe.
- Changed Luftwaffe bomber group name to III/KG51.
- Removed the use of high altitude radar.
1/7/2018: Incremented to revision 6.
- Adjusted Allied and Axis targets based on new map layout.
- Modified some Luftwaffe unit names at the request of Devil505.
- Clearly defined the usage of level bombers and attack aircraft under “Victory Conditions”.
- Edited the “Battle Overview” section for more simplification.
- Added the “Usage of Ancillary Aircraft” section which defines the usage of the JU87D-3 Stuka and IL-2 Type 3 Sturmovik.
- Rewrote the “Point Scoring” section to focus on points per a single sortie rather than points for each object destroyed.
1/8/2018: Incremented to revision 7.
- Changes all Bf109s to the G-2 model.
- Minor edits in the Date and Times section.
1/12/2018: Incremented to revision 8.
- Set scenario dates
1/14/2018: Incremented to revision 9.
- Modified the fighter and bomber warning range to 3 miles.
- Changed the point scoring scheme for bombers.
- Changed the point scoring scheme for attack aircraft.
- Changed the hardness of hangars to 2000 lbs.
- Changed the hardness of bunkers to 500 lbs.
- Change the downtime for all objects to 5 minutes.
- Added an additional target to each side per frame.
1/14/2018: Incremented to revision 9.1.
- Modified the document image on the first page of the document.
- Made minor text edits.
- Edited sections of the MOTD.
v10, 1/15/2018
- Simplified layout and formatting.
- Allow Ju 87 to carry 4x50 kg if it wants in addition to the 500kg centerline.
- Have scoring for kills be for kills and don’t have to count Losses (to simplify task for calculating scoring). Can put it back if Swareiam wants.
- Made downtime for radar be 1 minute instead of 5 minutes.
- Added references.
- Changed radar so that there is no dot radar, and counters above radar only. Should it be enemy counters only, or both friendly and enemy?
- Added rules about moving registered pilots around (basically, only if they agree).
- Allow the CO to fly whatever he wants, even over group limit.
v11, 1/16/2018
- Put radar as counters for enemy only.
- Added a town to each side as available target.
v12, 1/19/2018
- Forgot to set town down time. Now is set.
v13, 1/27/2018
- Added Dantoo as allied CO.
- Targets are made the same for all frames (the same as frames 3 and 4 from earlier versions).
- Airfields a16 and a67 are removed from use, but side CM’s may enable rear fields if other fields look like they are capped or about to be capped.
v14, 2/7/2018
- Put in updated version of the map.
- Note in settings on how radar is set north of v105/v106 (so that enemy radar doesn’t encroach on friendly areas).
v15, 2/11/2018
- Corrected an aspect of wording for radar setting. Radar outside the battle area should be set to not encroach on other side’s territory, not just radar on one side of the battle area. Specifically, a23 and v82 (off the battle area to north) need to be set to Rook instead of axis so that axis doesn’t have deep encroachment of radar into allied territory. Likewise, a67 (off the battle area to south) should be set to rook so that allies don’t have deep encroachment coverall all of the south of axis field a68.
v16, 2/12/2018
- Also, should turn off base flashing for those aforementioned rook bases.