These days (early 2009), graphics cards have graphics processing units (GPU's) that give off a lot of heat and need powerful fans. These fans can be quite noisy. The free program RivaTuner can be used to minimize fan noise while still providing enough cooling for you card. You can implement temperature control, like with a thermostat. Here's how.
Disclaimer: Follow these instructions at your own risk. These steps worked for me, but they might not for you. Try them and pay attention to your GPU temperature to make sure things work. If you follow these instructions and burn up your card because you set your fan too low or because RivaTuner doesn't work or because for some reason your system doesn't work like mine does, I disclaim any responsibility.
This was done on RivaTuner v2.22.
Get RivaTuner from http://www.guru3d.com/rivatuner/, and install it.
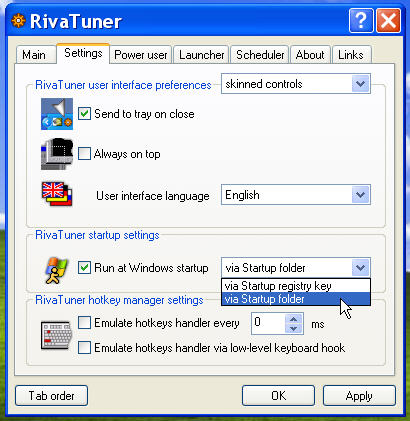
Start RivaTuner (go to the Start menu, All programs, RivaTuner v2.22 (i.e., "Start->All Programs->RivaTuner v2.22->RivaTuner"). Once RivaTuner is running, click on the "Settings" tab. Make sure the "Send to tray on close" option is checked and that the "Run at Windows startup" is checked. For "Run at Windows startup", use the "via Startup folder". Click the "Apply" button.
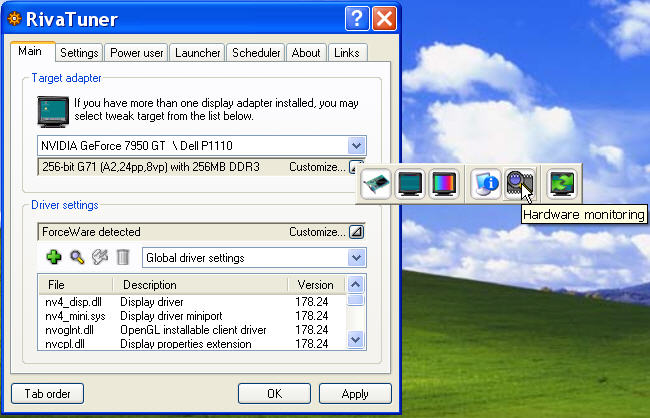
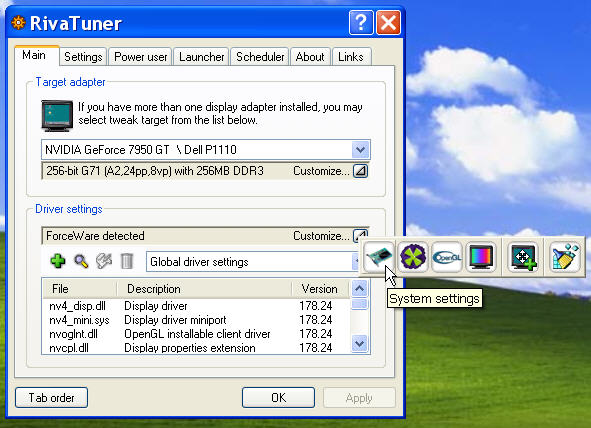
Now click on the "Main" tab, click on the "Customize..." icon in the "Target adapter" panel. Then click on "Hardware monitoring".
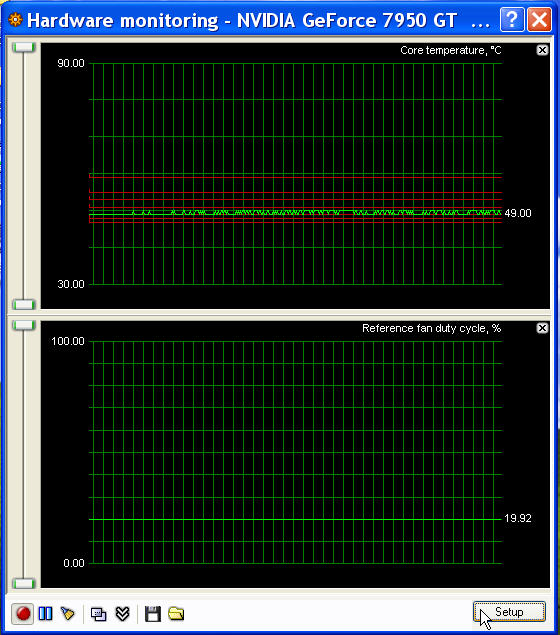
In the "Hardware monitoring" window, click on the "Setup" button.
In the "Hardware monitoring setup" window, in the "Data sources" panel, make sure that "Core temperature" is selected to show up. You can select other things to look at in the graphs, too, if you wish (like "Reference fan duty cycle" and other things).
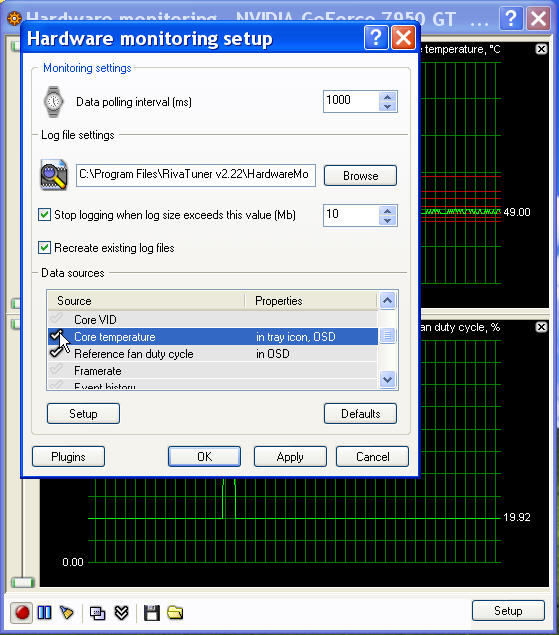
Select "Core temperature" and click on the "Setup" button. You will get a window to set things about core-temperature monitoring. Make sure the checkbox for "Show core temperature in tray icon" is selected, and make sure the checkbox for "Show core temperature in on-screen display" is selected. The first displays the temperature in your tray at the bottom of your screen, and the second displays the temperature on screen when you are gaming. You can turn off on-screen display later once you are sure temperature control is working correctly.
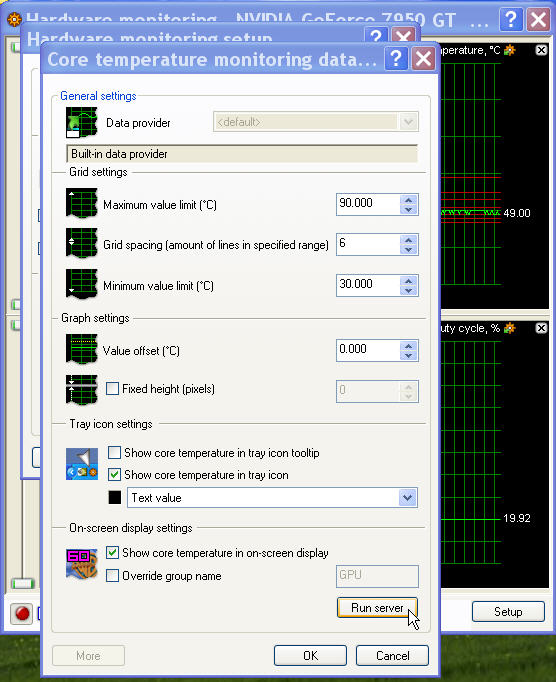
Click on the "Run server" button. (Or click on "Start->All Programs->RivaTuner v2.22->RivaTuner Statistics Server".) You need the server running for temperature to be displayed on screen when you are gaming.
Click "OK", etc., to close the various windows until you get back to the main RivaTuner window.
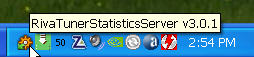
Go into your tray and click on the icon for the RivaTuner Statistics Server. It looks like this (where my mouse icon is pointing). (Note also that the GPU core temperature is displyed in the tool tray -- it shows 50 C currently.)
Set the Statstics Server to start when Windows starts by having the "Start with Windows" selection set to "ON".
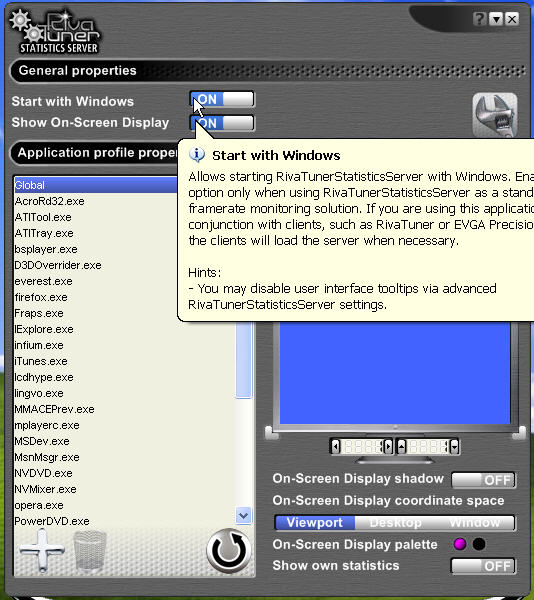
Then close this window (but don't exit the application) by clicking on the down arrow icon (next to the "?" icon) in the upper right of the window. Do not click on the "x" icon -- that will shut down the Stastics Server. (If you mistakenly do that and need to start the Statistics Server again, you can do it with the "Run server" button in one of the previous windows, or you can go into "Start->All Programs->RivaTuner v2.22->RivaTuner Statistics Sever".)
At a later point, if you no longer want the temperature displayed on screen
while you are gaming (such as once you are sure your fan setup is working as
you intend), you can turn it off and set Statistics Server not to start with
Windows.
Click on the "Main" tab, click on the "Customize..." icon in the "Driver settings" panel. Then click on "System settings".
You will get a "System tweaks" window, as follows. Select the "Fan" tab, and set your fan for "direct control" instead of "automatic control" as follows.
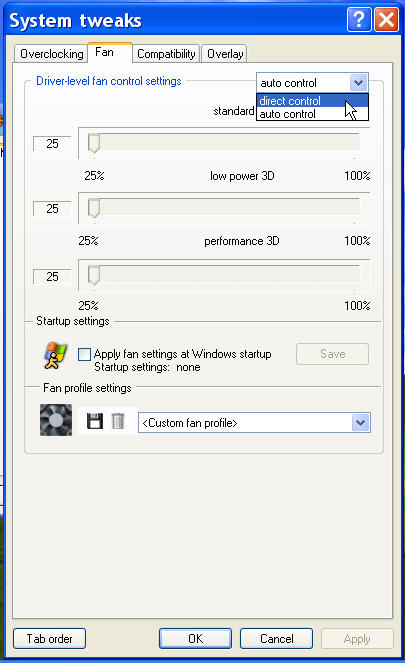
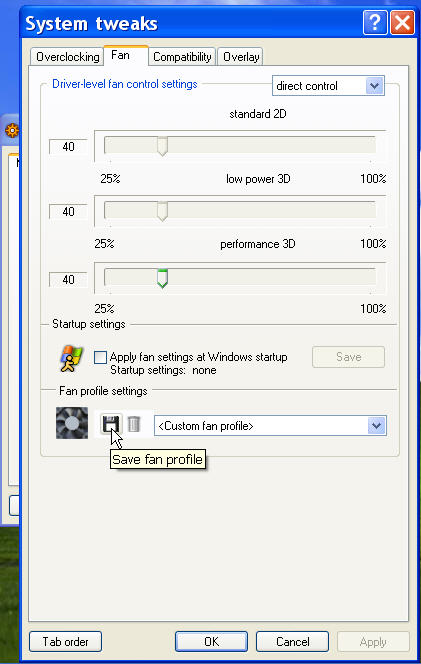
Set all your fan speeds to 100% and click "Apply". This will set your fan to 100% speed, which will allow you to see what your lowest steady-state GPU temperature is. Or, if the fan is worryingly loud at 100% and sounds like a jet engine, try 50% or 40%. My nVidia GeForce 6800GS was OK at 100% fan, but my GeForce 7950GT has a more-powerful fan that at 100% sounds like a strong hair drier. I use 40% for the 7900GT. Whatever you pick here will be used as your maximum fan setting later.
Save your fan profile. Name it "fanMax" by clicking on the "Save fan profile" icon as shown below. This is your maximum fan setting you'll use.
Make an intermediate fan setting. For example, if you picked a maximum fan setting of 40%, set your fans to 30%, click the "Apply" button, and save another fan profile. If you picked a maximum fan setting of 100%, save another fan profile at, say, 50%. Or pick some other intermediate fan setting and save a profile for it. Call it "fanIntermediate".
Let your fan run at fanMax (whatever you picked as your maximum fan setting you want to use) for about 5 minutes (enough to reach steady state) and look at what your "Core temperature" is. This is your baseline temperature -- about as cool as your GPU is going to get. For reference, for my nVidia GeForce 6800GS with room temperature of about 68 degrees F, the GPU (or "core") temperature with the fan at 100% is about 45 C or so with no computationally intensive graphics program running (i.e., just your normal Windows environment). For my nVidia GeForce 7950GT under similar circumstances with fan at 40%, the core temperature is about 46 C or so.
Now add a few C to that temperature (for my 6800GS and 7950GT, that would be about 49-50 C, say). We'll call this hereafter in the document "Nominal Temp". It's time to see how low you can set your fan and still be at that temperature. Go back into your fan-speed settings (click on the "Customize..." icon in the "Driver settings" panel, then click on "System settings"). Set your fan speed to 30% and watch your core temperature. If it goes above 49 C (or whatever your Nominal Temp is, i.e., baseline plus 4 or 5 C), set your fan speed to 40% and see if it goes below 49 C, and so on. Find the lowest fan speed that gets your core temperature at or below your Nominal Temp. On my nVidia GeForce 6800GS from XFX (the OEM brand), I can set my fan to 30%, and the core temperature settles at 48 C. On my nVidia GeForce 7950GT from BFG (the OEM brand), I can set my fan to "auto control" (which runs the fan more slowly even than the minimum setting of 25% in RivaTuner), and the core temperature settles at 49 C.
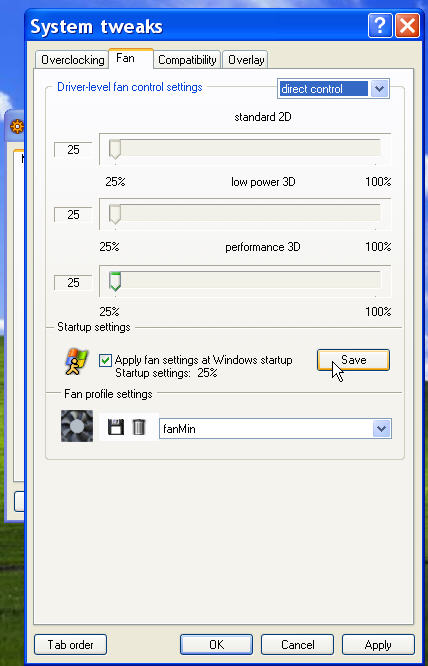
So, for my 6800GS, I would set my fan speeds to 30%, click the "Apply" button, then save a profile and call it "fanMin". For my 7950GT, I would save a fan profile with control settings set to "auto control", click the "Apply" button, then save a profile and call it "fanMin".
If what you developed for fanMin above uses "automatic control" instead of direct control, you don't need to do the following. ("Apply fan settings at Windows startup" should be unchecked in this case.)
If what you developed for fanMin above uses particular fan settings (such as 30%), then you should do the following.
In the "<Custom fan profile>" dropdown box, select your "fanMin" profile and click the "Apply" button.
Now make sure the "Apply fan settings at Windows startup" checkbox is checked, and click the "Save" button.
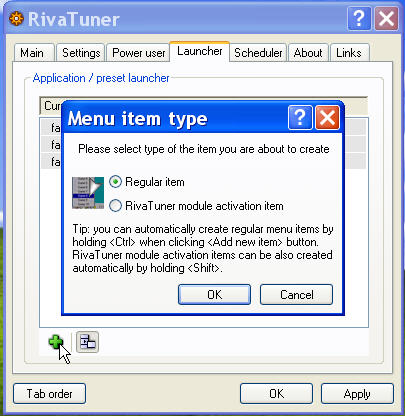
Click on the "Launcher" tab. Then click on the "Add new" icon (the green "plus" sign at the bottom). Click on the "Regular item" radio button, then on the "OK" button.
Now add a Launcher item named "fanMax". Click on "Associated fan profile" and select the "fanMax" fan profile. Then click the "OK" button.
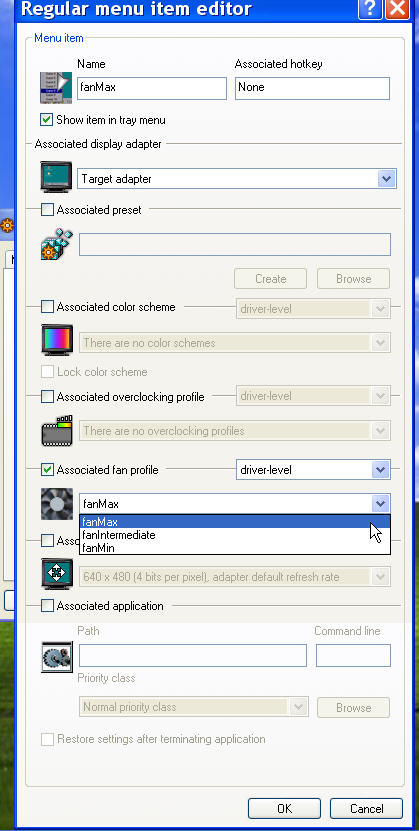
Likewise, make Launcher entries called "fanMin" that uses the fanMin associated fan profile and called "fanIntermediate" that uses the fanIntermediate associated fan profile.
This is where we set up our actual temperature control. We are going to set it up like how an airconditioner works. When the temperature goes above a certain level, fanMax will start up. When it goes back down below a lower temperature, the fan will go back to fanMin. We'll throw in some other things (like fanIntermediate) to make it all work better.
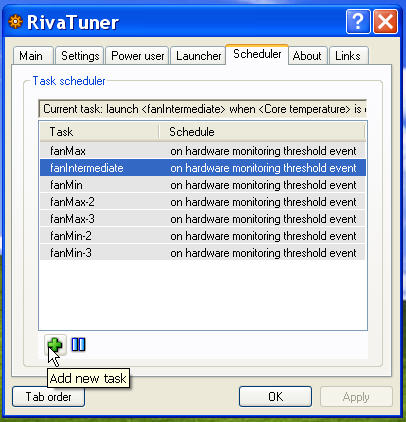
Go into the "Scheduler" tab, and click on the "Add new task" icon (the green "plus" sign at the bottom).
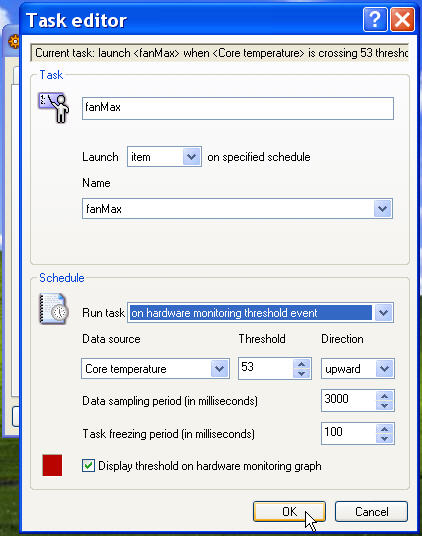
Make an entry for fanMax. Call the task "fanMax". Set "Launch" to "item". Set "Name" to "fanMax". Set "Run task" to "on hardware monitoring threshold event". Set "Data source" to "Core temperature". Set "Threshold" to be 4 C above your Nominal Temp. This is what will cause your fan to go to the fanMax setting. For my 7950GT, the Nominal Temp is about 49 C, so I set this to 53 C. Set "Direction" to "upward". Set "Data sampling period" to 3000 (so that we are sampling every few seconds, which is enough without requiring a lot of resources). Set "Task freezing period" to 100. (You don't really need to worry about task freezing here -- I set it to something other than zero just in case I ever put in any tasks that need higher priority.) Finally, click the "OK" button.
Add a similar Scheduler event named "fanIntermediate":
Add a Scheduler event named "fanMin":
Now we have our basic temperature control enabled. When the temperature goes to Nominal Temp + 2 C, fanIntermediate speed starts up. If the temperature continues to climb above Nominal Temp + 4 C, fanMax speed starts up. Thus, it only uses fanMax if fanIntermediate isn't good enough. Then, if the temperature goes back down under Nominal Temp, the fan speed goes back to fanMin. The fact that the fan goes to fanMin at Nominal Temp but doesn't go to a higher speed until Nominal Temp + 2 means the fan won't be going high then low then high then low interminably, which is what it often would do if the speed went to fanMin at Nominal Temp then to a higher speed exactly above Nominal Temp. This is how a thermostat works on an airconditioner. The AC turns on when temperature goes above X, and it turns off when the temperature goes down to X-delta.
Now there are some safety features to implement. I have run into some issues that can mess up the control mechanism above as a result of timing issues and various other programs or internal driver mechanisms fighting over fan speed (such as while moving into and out of graphics modes in games). I put in two more Scheduler events. If fanMax is missed at its regular turn-on temperature, as the temperature continues to climb, it will trigger other fanMax events. This is to make sure fanMax is turned on even if lower-temperature fanMax events are missed.
Add a Scheduler event named "fanMax-2":
Add a Scheduler event named "fanMax-3":
Likewise, in case fanMin events are missed, I put in more of those at lower temperatures so that my fan is less likely to get stuck on fanMax and remain annoyingly loud when it doesn't need to be.
Add a Scheduler event named "fanMin-2":
Add a Scheduler event named "fanMin-3":
This results in good temperature control for my 6800GS and 7950GT cards. The cards are quiet and at about 50 C when I am doing normal work, and they use higher fan speeds only when needed to keep the temperature below about 60 C (such as when I'm playing graphically intensive games).
You might have to find different temperature points for your card and different fan settings, as described above. Also, you might pick larger temperature gaps between your Scheduler events, might choose to use more levels of fan speeds, etc.
However, make sure you pay attention and don't burn up your card!
-- Brooke (brooke "at" electraforge.com)